Posts

32 Bit Linux Assembly

Image
Hi All, this blog post contains the basic hello world program and explanation to Linux based 32 Bit Assembly Language. Before moving to this topic, we should know "What is Assembly Language?" so, I would like to start my blog with the answer to the above question. Assembly language is a low-level programming language with which we can communicate directly with the microprocessor. also, it is very specific for a processor family. I will explain the intel 32-bit processor-based assembly language in this blog. and it has one to one correspondence with Machine Code. Machine code is a binary format language that can be understood by machines only. because a human can not handle the bunch of binary letters. so assembly language came to short out this issue. it is working as an interpreter or bridge between humans and machines. you can get more idea about the scenario from below the image. In Linux, you can use "lscpu or cat /proc/cupinfor" these commands

Android application penetration testing lab setup

Image
Now the day's Android mobile applications are widely used everywhere because it makes users life much easier. but it contains many security vulnerabilities. day to day it has affecting by new type of attacks. as a penetration tester, we have to find out these security vulnerabilities before someone exploits. in order to archive that, we have to create a proper lab environment. so let's start to create a penetration testing lap. 1st of all we need a rooted device for android penetration testing. because during the test we need to use runtime debugger and other SSH connection which tools are needed root privilege to run on the mobile device. so the device should be rooted in order to get root privilege. the issue is if we root our personal mobile phone, we will lose the warranty and other security protection so, it is not a good idea. thus penetration tester must have a separate device for testing purpose. but everyone cannot use separate devices. so i suggest emulators. spe

BugBounty:- Hidden field reflected XSS on wso2 cloud server (Identity_server, api_manager and etc..)

Image
.  a few days back i got a mail from my wso2 Cloud Server account. so i just tried to login my account but i could not. because i forgot my cloud account password. So i was trying to reset my account by using the recovery email method. while i trying rest my account through recovery link, i  noticed that URL has a parameter which is reflected to response. hence i had got an idea to check XSS vulnerability on that page. while i am trying to exploit XSS vulnerability, I could able to find "double quotes" are escaped from the filter. then i tried several payloads which only have "double quotes" and javascript event handler. i could not get xss pop up from that webpage. so i was confused. because my request payloads are reflected response without any changes. but XSS is not succeeded. suddenly i have noticed that vulnerable parameter's input type is hidden. thus the javascript event handler is not going to execute because the javascript event handlers will be exe

Oauth 2.O grant types

Image
whats is Oauth? it is a protocol which is helped to provide user's resource to a third application with user authorization also it allows, resource owner can be customized 3rd party application resource scope. so it allows a resource to 3rd party client based on users authorization. if you need more information about this protocol you can read this " Sample OAuth protocol base servers and client ".  there are 4 type of actors in this protocol such as resource owner(user), 3rd party application, authorization server and resource server. we already discussed OAuth follow and other important stuff in our previous posts. so in this post, we are going to discuss OAuth grant types. OAuth has 5 grant type those are authorization code grant type, implicit grant type, resource owner credential grant type, client credential grant type and refresh token grant type. however, we only consider up to four type of grant as main grant types because most of the systems don't use

Auth0 based login app

Image
figure 1 this client application based OpenID connect protocol. so it needs an identity provider helps to work. in my case, I chose Outh0 as my identity provider. if we want to use Auth0 platform we have tea create an account for us. once you created the account you will see an option called " New Application" on your dashboard. you can see the preview on figure 2. after clicking "new application" button you have to choose an application type. in my case, I have chosen "Regular Application" option. once you completed the registration, you will able to get ClientID, ClientSecret and certificate from settings. this certificate helps the client to verify the OIDC signature. figure 3 contains ClientID and ClientSecret information and figure 4 contains information about certificates. figure 3 figure 4 now you have everything to create an OpenID Connect web application. so we have to develop an OIDC client application. below im

The technology behind login with social media (OpenId connect)

Image
we have to use several applications and website for our day to day activities. but most of these applications allow to getting their service after creating the user account. so if we create accounts in everywhere, we should remember all user account credentials. it is a hard thing. also, it is a time-consuming activity. hence  OpenId connect protocol helps us to sort out this problem. it allows us to use the social login feature.  it means we can login into a platform by using another well-known platform. What is OpenID Connect (OIDC)? it is a protocol which came from OAuth protocol family. some of the people have questions like this " this protocol almost similar to OAuth then why we need this?" because OAuth only focuses on authorization but OIDC also focuses on authentication.  it means OAuth shares resources to anyone who has resource access token. it is not going to check who will be received the resource. but  OIDC will check if the resource will be received by th

Install android studio on the parrot os

Image
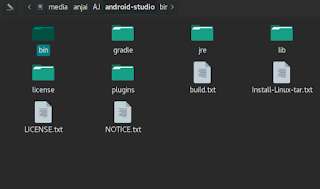
parrot OS is based on Linux environment so we have to download Linux version of android studio. if you want Linux version android studio just click here . after the download is completed you will get the zip file of the android studio. so you need to unzip it first. then you can see several files within the unzipped folder. figure 1 represents the sample output. Figure 1 then go to bin folder which is stored in the unzipped folder. after opening the bin folder, you can see studio.sh shell script. if you execute that, the android studio will be running on your PC's.  Note:- you have to give execute permission to studio.sh for the current user before you execute studio.sh script. (sudo chmod u+x studio.sh) Figure 2 but we will be doing like this. it's annoying, so now we are going to the terminal command that is helped to us to access android studio by using terminal commands.  move your unzipped file to "/root" from Downloads. then go to "/usr